Showing posts with label gardening. Show all posts

Sunday, August 7, 2016

It's Not Too Late To Plant These Veggies In August

Late to the game this year? These end-of-summer edibles delight in hot days and muggy nights and grow quickly enough to produce a harvest in two months or less.

August 13, 2015
http://www.rodalesorganiclife.com/garden/its-not-too-late-to-plant-these-veggies-in-august/slide/6 
boy with lettuce
1/6
PHOTOGRAPH BY LANE OATEY/GETTY

When the heat brings an end to the harvest of lettuce, peas, and many other cool-weather crops, it’s time to compost the sun-scorched remains of those spring edibles to open up garden space for the next round of vegetables. Before selecting your crops, calculate the number of growing days left for your garden, so your harvest won’t be cut short by frost. (Your county’s cooperative extension service can tell you when to expect the first killing frost in fall.) Then use the “days to maturity” numbers on seed packets to help choose varieties that will mature within the remaining growing season. The veggies that follow are all suited to mid- to late-summer sowing directly into the garden. All germinate quickly in warm, moist soil and thrive in summertime heat.
yellow squash
2/6
Summer Squash
PHOTOGRAPH BY THOMAS MACDONALD

Summer squashes—a group that includes zucchinis, yellow crookneck squash, and those cute scalloped pattypan squashes—are the ultimate summer-sprinter crop. Few plants can compete with them for vigor, rate of growth, or sheer quantity of production. If your spring-sown squashes peter out or succumb to pests or disease, start a second round in summer. Many summer squashes begin to produce in less than 60 days, and some are true speed demons, such as Golden Egg (41 days), Limelight zucchini (50 days), or Ronde de Nice (45 days).
beans
3/6
Bush Beans
PHOTOGRAPH BY THOMAS MACDONALD

Few crops are better than bush beans for filling in midsummer gaps in the vegetable garden. Most varieties grow quickly, thrive in heat, and tolerate variable amounts of water. For best results, stick with fast-maturing snap bean varieties, such as Provider (50 days), Royal Burgundy (55 days), or Blue Lake Bush (52 days). Gardeners in warmer zones may still have time to plant and harvest slower-growing pole beans or shelling beans.
cucumber insides
4/6
Cucumbers
PHOTOGRAPH BY COMSTOCK

It takes surprisingly little time to grow a crisp, crunchy cuke. This vining vegetable grows best and fastest when treated to a nice dose of summer heat; many varieties shoot from seed to first harvest in less than two months. Varieties worth trying include Straight Eight (58 days), Sweeter Yet (50 days), and Northern Pickling (48 days).
carrots
5/6
Root Crops
PHOTOGRAPH  BY MITCH MANDEL

Carrots, turnips, and beets are sweeter when the roots are harvested in cool weather, but they don’t mind heat while they grow. Time your summer seeding so the crops are ready to harvest a few weeks before first frost—and plant an extra row of carrots for winter storage. As soon as the seedlings appear, surround them with straw mulch to keep the soil cool and moist. Try early varieties of carrots, such as Mokum or Nelson (56 days); Red Ace beets (50 days); and crisp, white Hakurei turnips (38 days).
red chard
6/6
Hot-Weather Greens
PHOTOGRAPH  BY MITCH MANDEL

Summer’s heat makes impossible most of the delicate spring greens, but there are other options. For a bit of leafy green in the late-summer garden, consider chard (approximately 50-60 days, less for baby greens), kale (approximately 50-60 days, less for baby greens), or New Zealand spinach (50 days).

Thursday, June 25, 2015

Building Homesteading Partnerships

http://www.countrysidemag.com/building-homesteading-partnerships/
Pantry4
I caught up with Bryce as he loaded a pair of speed skis into his beat-up pickup truck.
“Hey, I’ve got a quick question.”
Bryce slid the skis through the back window and between the bucket seats. “Yeah, what’s up?”
“Are you gardening this year?” I pointed to his front yard, which had not been covered with lawn since either of us moved into the neighborhood. Bryce loves fresh produce as much as I do and attempts to grow what he can in his patch of dirt.
He shrugged. “Yeah, I guess I need to get on it.” Every year, Bryce plants at the last minute, harvesting meager crops from neglected plants just before frost.
“What if we gardened for you in trade for whatever produce you don’t need?”
His eyes lit up. “Yeah….” He scanned the barren dirt yard. “It is a lot of work for one guy.”
Unlike me, Bryce is single with no children. Even from his neglected garden, he harvests extra and offers it to my family. Bryce is often at work or playing outdoors. He knew a good deal when he saw it.
Within minutes, we had a basic plan: His dirt, my seeds. His water, my work. His produce, my food preservation skills. Because his yard was just across the fence from my own, I could send my children to pull weeds or turn on the water. Bryce was excited about pickles, popcorn, and marinara sauce. And, I told him, if I ended up using more than my fair share of the produce, I’d give him fresh eggs from my chickens.
Thus we acquired Garden #3.
Slowly, we’re taking over the neighborhood. Garden #1 resides at my rented property. Here I have my chickens and the crops needing the most attention. A block away lies Garden #2, in the yard of a friend who eschews manual labor but loves a home-cooked meal. In the house to my right is the man who does repairs in trade for food for his family. The neighbor on the other side lets me glean apricots from his tree. And though the lady at the end of the block has no verbal agreement with me, she has a small beehive. I like to offer produce from my garden, made possible by her bees.
Living a mile south of downtown Reno, we don’t have access to the farms we want. We also live in a high plains desert, which limits most horticultural endeavors. Very few of us can “do it all,” and many have additional jobs and families to care for. But working within a tight group can share resources a long way.

Start Small

The first year I moved into this little house, my husband and I stayed up until 2 a.m. on many nights to finish canning peaches, marinara sauce, or jelly from the grapes growing over the back fence. As people at church asked about my purple-stained hands, I realized few knew how to can. Even women of my mother’s generation couldn’t make jelly. As I explained how I preserved food, I gathered interest.
The next year, I had too many grapes and not enough time. I approached a few friends and asked, “Do you want to learn how to make grape jelly?”
“Yes!” they immediately exclaimed. “What should we bring?”
“Just the sugar and jars for your own jelly. I have all the grape juice.”
That year, I finished canning with the help of friends. My husband didn’t have to step into the steamy kitchen. More friends, happy husband. We all won.
Those first years, I didn’t yet have chickens. I hadn’t learned how to ferment or to make cheese, and garden #1 was just called, “The garden.” If I had attempted all that while settling into a new house and a fairly new career, I’d have been overwhelmed to the point of failure. My pleas for help wouldn’t have reached far because I didn’t know anyone else. The homesteading network had to grow slowly to be successful, just as any worthy endeavor.

Network

You do not simply make grape jelly. You take pictures of purple-stained hands and post them on Facebook, touting your jelly-canning escapades.
Soon I received referrals to friends-of-friends wanting to learn. Katie referred me to Beck, who dearly longed to learn the art of canning. Soon Beck and I became good friends. We shared experiences through Facebook messages, meeting to exchange seeds and plants. Beck introduced me to Danielle, an avid gardener and canner who lived in upstate New York but now has a Reno apartment and three small children.
Danielle started a Facebook group, bringing together like-minded friends. Beck and I help moderate. In less than a year the group has swollen to over 270 members. We discuss all things homesteading, share pictures and brag or offer items for sale.
Each year, I raise several hundred plants, keep what I need, and sell the rest to send kids to camp. I started the first year with about 200 plants, and since then the sale has snowballed. Now I start about 1,000 plants and sell on a first-come, first-served reservation system. It’s become so involved that last year I lost a few varieties because of unmonitored greenhouse temperatures while I worked two jobs. I had no time to market my seedling list and I made very little profit. This year, Beck and Danielle worked miracles. By creating Google docs to organize orders, helping with the work, and sharing the list, they’ve helped me pre-sell over 700 plants. We anticipate this year to be the most profitable. And guess who’s getting free plants for their own gardens? (Don’t tell. It’s a surprise.)

Have Something To Offer

“So how do we get into something like this?” asked David as I drove back from the cheese-making class.
Juana and David had accompanied me as I taught a dozen new friends how to make mozzarella in thirty minutes. Crystal, from the Facebook group, hosted the class and bought the milk. We both invited our friends.
“I don’t think we can,” said Juana. “We live in an apartment.”
I smiled as I passed convenience stores and housing complexes. “You don’t have to own chickens or have a garden,” I explained. “Just network and have something to offer. There are a lot of people who have those chickens but need help caring for them. What do you have that you could trade?”
Juana paused while she thought about it. “I don’t know,” she said. “I do crafts.”
“We can work,” said David.
“Really, that’s what a lot of farmers need most,” I explained. “A lot of us have the gardens or the animals, but we also have to make a living. We’d gladly share our produce with someone who showed up for a few hours to help weed or plant.”
Apartment-dwellers often have other skills valuable to farmers, including childcare, sewing skills, or technical knowledge.
My friend Caidyn posted on Facebook, “Up with the fishes in the morning!” He was out on Pyramid Lake, which is well known for large, delicious trout.
“Are you pulling in any big fish?” I asked in a comment. “I used to trade homemade bread for fish when a coworker went to the lake.”
Caidyn and his family don’t eat much trout. He pulled in some twenty-inchers but had released them. “Wish I knew,” he said.
I told him I would buy and/or trade for any decent-sized trout he caught. Caidyn was excited about the potential of another mutually beneficial decision.
Even those who aren’t “able bodied” have something to offer.
Though my friend Beck would love to do more, a painful disability limits her movement. Beck’s Google doc saved so much time with my seedling sale that I’ll gladly share plants and produce with her. She also serves as my local media liaison for my writing and farming projects.
When you make your connections, be sure you reciprocate somehow. People offer each year to “take anything I don’t want.” Homesteading is such hard work that it doesn’t even make sense to plant something I don’t want. Any bounty I cannot immediately use or store goes to those who offer something in return.

Be Willing To Work Hard

While at that cheese-making class, I explained how to purchase good milk.
“Do not buy ultra-pasteurized,” I said, “because it’s heated so high the proteins get damaged. You’ll probably use regular pasteurized milk because raw milk is illegal.”
All the cheese-students paused. A few jaws dropped.
Only twenty eight states allow sale of raw milk for human consumption Some states allow sale of goat milk, and some limit sales volume. Where I live, I simply cannot purchase it. Though Reno sits close to the California border, where sale is legal, anyone with a Nevada ID cannot purchase raw milk within a Californian establishment.
“But….” I glanced over at Mandy and let her finish for me.
She said, “I just bought some baby dairy goats. I’ll have milk in about a year. And I live on a big dude ranch that needs a lot of work done. If you come help me, I’ll help you out.”
I’ve known Mandy for years. She means what she says. Though she has the land and the knowledge, Mandy also has three small children. Her dreams of sustainability would have to wait many more years if it weren’t for homesteading partnerships. Mandy had attended the cheese-making class because she needed to learn how to process milk. She needed to network. Mandy’s milk will be legally accessible to friends if she gives it as a gift of gratitude for their hard work.
You don’t have to drive to an old dude ranch in the desert to enjoy these partnerships. Barb, my 75-year-old massage client, is not about to climb a ladder to harvest from her 30-year-old apple tree. Each year, she calls me up. “I don’t know how many the birds have left,” she said. “And I don’t know how many worms there are. But come get them.”
We have some rules for our kids: Clean up Barb’s fallen and rotten apples first. Be kind to her tree. Fill two buckets with the nicest apples and put them in Barb’s garage. Rake the lawn before we go. If Barb isn’t feeling well, she only has to get up long enough to let us know she’s home. We receive a tree full of free, organic apples and she gets free yard work.
Never make people regret their offer. Or it won’t be offered next year.

Know Your Circle

I share a unique agreement with two friends. With eight children between the three of us, we don’t have surplus food money. We also don’t want to use tight budgets as excuses to feed our children junk.
We’ve developed a money-saving shopping system. If we find clearance sales or produce deals and have extra money, we buy enough for everyone. We know the other two ladies will reciprocate in the future. That way, if apples are four pounds for a dollar in my neighborhood and the other two friends can’t leave their homes, we can all take advantage of the same sale. A similar agreement exists within our gardens. If I grow cucumbers and harvest more than my family can use, I contact them first. Usually, they put all the cucumbers to good use. If they can’t use them, I offer the food to someone else. When they have extra tomatoes or surplus canning jars, they ask if I need them.
This group exists because of trust and a shared vision. Members are only threefold because trust thins the further you reach from your inner circle. If we had different eating styles, this plan wouldn’t work. Feelings would get hurt if one felt more entitled or selfish than the others. We don’t plan to add a fourth member to the group because we need to keep that trust factor, but we’ll gladly tell others how to create their own groups.
Larger circles include informal scratch-my-back agreements. Last year, Amy lost her first chicken to overzealous dogs. Though the hen faded fast, she was still alive and suffering, and Amy couldn’t complete the deed herself. She contacted Sheryl, who contacted me. We handled the sensitive job with compassion. Amy has always been grateful. Just yesterday, she offered two wooden shipping containers, which would make excellent planter boxes. I deferred the offer to Beck. Those containers will soon be handicapped-accessible planter boxes.

Be The First Name For Referrals

As I explained to David how to contribute to a homesteading circle, I also detailed the importance of getting his name out there.
“Nobody can ask you to help on his farm if he doesn’t know you’re interested in helping,” I said. “So get on social networking. Volunteer at urban farming projects. Think about what you have to trade, and be sure people know about it.”
It could start with a blog, or a cooking group. You could be a small-time neighborhood gardener searching for someone with similar tomato interests. Eventually the network grows and you can access zucchini you can’t grow on your apartment patio or meat that’s unavailable at your grocery store.
In the six years since I stayed up until 2 a.m. canning with my husband, our endeavor has grown to an informal educational system. I write for national poultry and farming magazines, sharing the info with local groups. With plans to acquire a static teaching location, Beck and Danielle help offer classes within churches and homes. Friends visit Ames Family Farm for research as they determine whether they want to undertake homesteading endeavors. Each year more people learn how to can, then invite friends and family to learn the next year. When they have apples or need advice on making vanilla extract, they defer to the members within our little homesteading community.
We accomplish miracles with very little space.

Tuesday, January 27, 2015

The Four Steps Required to Keep Monsanto OUT of Your Garden


Seed catalogs for the upcoming growing season are arriving in mailboxes across the Northern Hemisphere with home gardeners everywhere starting to plan which seeds they will sow in their spring gardens. A positive trend in recent years is the growing number of gardening enthusiasts choosing to plant gardens using organic and/or heirloom seeds.
What most of these home gardeners don’t realize is that corporate behemoth and GMO titan Monsanto has been gobbling up the seed market faster than a caterpillar can munch a tomato plant! With one fell swoop in 2005, Monsanto grabbed approximately 40% of the US vegetable seed market with its acquisition of Seminis.
This means that a home gardener could unknowingly be supporting the development and proliferation of genetically modified crops if the seeds used are from Seminis.  In addition, Monsanto now apparently owns the trademark for many of the names of the heirloom seed varieties themselves!
Planting a sustainable home garden is much more than just choosing certified organic seeds and seedlings because Monsanto has cleverly positioned itself to make money off the home gardening trend.
Does this mean that even if you buy organic or heirloom seeds from a completely independent company some of your purchase might be supporting the bad guys?
Yes, it does.
Surprise!
Home gardeners would do well to bone up on where to purchase their seeds so they aren’t inadvertently doing business with companies that maintain a working relationship with Monsanto-Seminis or were acquired by them.
Buying Organic or Heirloom Seeds Without Supporting Monsanto
Here are the recommended steps for the 2014 growing season for those who want to truly strike a blow for sustainability in every way with their home gardens:
  • Avoid buying from the seed companies affiliated with Monsanto. Here’s a list of these seed companies by location (click under “Where to Buy” and select your location for a list of dealers to avoid): http://www.seminis.com/global/us/Pages/default.aspx
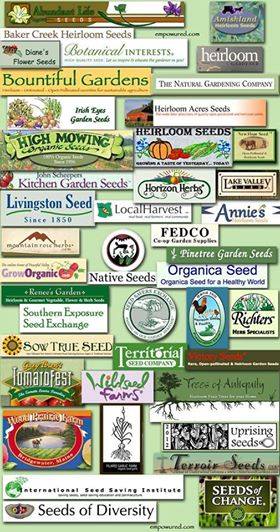
  • Buy from companies Monsanto HASN’T bought and are not affiliated or do business with Seminis:  The graphic to the right indicates numerous companies that are worthy of your patronage as compiled by the International Seed Saving Institute. Please note that this many not be a complete list.  If your seed company does not appear, just be sure to clarify with the owner about any potential affiliation with Monsanto-Seminis before buying from them.

Background on Monsanto’s Quest for World Seed Domination
Monsanto’s corporate quest is clearly to make money on each and every one of us whether we choose to eat supermarket frankenfoods produced with abominable, patented GM crops or carefully plant and tend an organic garden at home.  Here’s some background information on the subject you may find interesting as well as enlightening:
If you are a home gardener and have information to contribute regarding these steps, please add to the discussion in the comments section.  Also, please spread the word via gardening forums you may participate in that folks need to be very careful when seed sourcing for their spring gardens this year else they might be unknowingly supporting Monsanto.
Let’s make this the year when Monsanto’s grip on the worldwide seed market loosens and the movement to seed sustainability gains momentum!
**Update:  The day after this article was originally published in 2013, the CEO of a large GMO soybean seed company in the Midwest emailed me complaining that the article was short sighted and insisting that Monsanto is helping feed the starving people of the world.  He even went so far as to say that GMO crops are “proven safe”.  Click here for the text of this CEO’s entire email plus my written reply.
I have also received email complaints from two other seed companies, one in Canada and one in Arkansas, that do business with Monsanto-Seminis and were offended by what they viewed as inaccuracies in the post.  In response, I have adjusted the text slightly and moved linked sources to within the text rather than only listed at the end to make the message of the post as clear and precise as possible so as to not result in any consumer confusion over the information.
I have received no complaints about this article from seed companies completely independent of any affiliation or ties to Monsanto-Seminis.
Sarah, The Healthy Home Economist

Tuesday, December 16, 2014

Ruth Stout's System for Gardening

How to use mulch to cut down on weeding and heavy labor in your garden using the Ruth Stout gardening method.

'Mulch Queen' Ruth Stout claimed to have smashed saloons with Carry Nation in Prohibition-era Kansas and worked au natural in her roadside Connecticut garden, but her labor-saving, soil-improving, permanent garden mulching technique is what earned her lasting fame. Stout was born in 1884 and lived to be 96; by the 1950s, she was writing lively gardening books, including How to Have a Green Thumb Without an Aching Back and Gardening Without Work. Both are out of print, but Stout's technique remains consistent with the "no-till" gardening methods soil experts recommend today (see Building Fertile Soil). We thought you might enjoy meeting Stout through this excerpt from Gardening Without Work, which was reprinted most recently by The Lyons Press. — MOTHER EARTH NEWSMy no-work gardening method is simply to keep a thick mulch of any vegetable matter that rots on both my vegetable and flower garden all year round. As it decays and enriches the soil, I add more. The labor-saving part of my system is that I never plow, spade, sow a cover crop, harrow, hoe, cultivate, weed, water or spray. I use just one fertilizer (cottonseed or soybean meal), and I don't go through that tortuous business of building a compost pile.
I beg everyone to start with a mulch 8 inches deep; otherwise, weeds may come through, and it would be a pity to be discouraged at the very start. But when I am asked how many bales (or tons) of hay are necessary to cover any given area, I can't answer from my own experience, for I gardened in this way for years before I had any idea of writing about it, and therefore didn't keep track of such details.
However, I now have some information on this from Dick Clemence, my A-Number-One adviser. He says, "I should think of 25 50-pound bales as about the minimum for 50 feet by 50 feet, or about a half-ton of loose hay. That should give a fair starting cover, but an equal quantity in reserve would be desirable." That is a better answer than the one I have been giving, which is: You need at least twice as much as you would think.

What Should I Use for Mulch?

Spoiled or regular hay, straw, leaves, pine needles, sawdust, weeds, garbage — any vegetable matter that rots.

Don't Some Leaves Decay Too Slowly?

No, they just remain mulch longer, which cuts down on labor. Don't they mat down? If so, it doesn't matter because they are between the rows of growing things and not on top of them. Can one use leaves without hay? Yes, but a combination of the two is better, I think.
What is spoiled hay? It's hay that for some reason isn't good enough to feed livestock. It may have, for instance, become moldy — if it was moist when put in the haymow — but it is just as effective for mulching as good hay, and a great deal cheaper.
Shouldn't the hay be chopped? Well, I don't have mine chopped and I don't have a terrible time — and I'm 76 and no stronger than the average person.
Can you use grass clippings? Yes, but unless you have a huge lawn or have neighbors who will collect them for you, they don't go very far.

How Do You Sow Seeds into the Mulch?

You plant exactly as you always have, in the Earth. You pull back the mulch and put the seeds in the ground and cover them just as you would if you had never heard of mulching.

Isn't It Bad to Mulch With Hay That May Be Full of Weed Seeds?

If the mulch is thick enough, the weeds can't come through it.
One man in a group I addressed was determined not to let me get away with claiming that it was all right to throw a lot of hay full of grass seeds on one's garden, and the rest of the audience was with him. I was getting nowhere and was bordering on desperation, when, finally, I asked him:
"If you were going to make a lawn, would you plant the grass seed and then cover it with several inches of hay?" Put that way, he at last realized that a lot of hay on top of tiny seeds would keep them from germinating.
However, it's true that you can lay chunks of baled hay between the rows of vegetables in your garden and, in a wet season, have a hearty growth of weeds right on top of the hay. To kill unwanted weeds all you need do is turn over the chunk of hay. Now, this isn't much of a job but some ardent disciples of my system are capable of getting indignant with me (in a nice way, of course) because they are put to that bother. I have relieved them of all plowing, hoeing, cultivating, weeding, watering, spraying and making compost piles; how is it that I haven't thought of some way to avoid this turning over of those chunks of hay?

How Can You Safely Plant Little Seeds Between 8-inch Walls of Mulch?

One can't, of course, but almost before one gets through spreading it, the mulch begins to settle and soon becomes a 2- or 3-inch compact mass rather than an 8-inch fluffy one. It will no doubt be walked on, and rain may come; in any case, it will settle. As a matter of fact you won't need 8 inches to start if you use solid chunks of baled hay.

Many People Want to Know Why I Don't Use Manure and What I Have Against It

I have nothing at all against it; in fact, I have a somewhat exaggerated respect for it. But I no longer need it; the ever-rotting mulch takes its place.
I sort of complained, in my first book, that no one ever wrote an ode to manure, and through the years since then at least a half-dozen people have sent me poems they composed about manure piles.
I have been asked over and over if such things as sawdust and oak leaves should be avoided, the idea being that they make the soil too acidic. I use sawdust, primarily around raspberries, with excellent results. We have no oak trees, therefore I can't answer that question from experience, but I certainly wouldn't hesitate to use them; then, if it turned out that they were making the soil acidic, I would add some wood ashes or lime. I've had reports from a great many gardeners who have used both sawdust and oak leaves over their entire garden and have found them satisfactory.

How Often Do You Put on Mulch?

Whenever you see a spot that needs it. If weeds begin to peep through anywhere, just toss an armful of hay on them. What time of year do you start to mulch? The answer is now, whatever the date may be, or at least begin to gather your material. At the very least give the matter constructive thought at one; make plans. If you are intending to use leaves, you will unfortunately have to wait until they fall, but you can be prepared to make use of them the moment they drop. Should you spread manure and plow it under before you mulch? Yes, if your soil isn't very rich; otherwise, mulch alone will answer the purpose.

How Far Apart Are the Rows?

Exactly the same distance as if you weren't mulching — that is, when you begin to use my method. However, after you have mulched for a few years, your soil will become so rich from rotting vegetable matter that you can plant much more closely than one dares to in the old-fashioned way of gardening.

How Long Does the Mulch Last?

That depends on the kind you use. Try always to have some in reserve, so that it can replenished as needed.

Now for the Million Dollar Question: Where Do You Get Mulch?

That's difficult to answer but I can say this: If enough people in any community demand it, I believe that someone will be eager to supply it. At least that's what happened within a distance of 100 miles or so of us in Connecticut, and within a year after my book came out, anyone in that radius could get all the spoiled hay they wanted at 65 cents a bale.
If you belong to a garden club, why can't you all get together and create a demand for spoiled hay? If you don't belong to a group, you probably at least know quite a few people who garden and who would be pleased to join the project.
Use all the leaves you can find. Clip your cornstalks into foot length pieces and use them. Utilize your garbage, tops of perennials, any and all vegetable matter that rots. In many localities, the utility companies grind up the branches they cut off when they clear the wires; and often they are glad to dump them near your garden, with no charge. But hurry up before they find out that there is a big demand for them and they decide to make a fast buck. These wood chips make a splendid mulch; I suggest you just ignore anyone who tells you they are too acidic.
Recently, a man reproached me for making spoiled hay so popular that he can no longer get it for nothing. The important fact, however, is that it has become available and is relatively cheap. The other day a neighbor said to me, "Doesn't it make you feel good to see the piles of hay in so many yards when you drive around?" It does make me feel fine.
Now and then I am asked (usually by an irritated expert) why I think I invented mulching. Well, naturally, I don't think so; God invented it simply by deciding to have the leaves fall off the trees once a year. I don't even think that I'm the first, or only person, who thought up my particular variety of year-round mulching, but apparently I'm the first to make a big noise about it — writing, talking, demonstrating.
And since in the process of spreading this great news, I have run across many thousands who never heard of the method, and a few hundred who think it is insane and can't possibly work, and only two people who had already tried it, is it surprising that I have carelessly fallen into the bad habit of sounding as though I thought I originated it?
But why should we care who invented it? Dick Clemence works hard trying to get people to call it the "Stout System," which is good because it should have some sort of a short name for people to use when they refer to it, instead of having to tell the whole story each time. I suppose it does more or less give me a feeling of importance when I come across an article mentioning the Stout System, yet I am cheated out of the full value of that sensation because I've never been able really to identify the whole thing with that little girl who was certainly going to be great and famous some day. What a disgusted look she would have given anyone who would have offered her the title of Renowned Mulcher!
And it borders on the un-enthralling to have the conversation at social gatherings turn to slugs and cabbageworms the minute I show up. And if some professor of psychology, giving an association-of-ideas test to a bunch of gardeners, should say "moldy hay" or "garbage," I'm afraid that some of them would come out with "Ruth Stout." Would anyone like that?
If you want to learn more about the Stout System, you can locate copies of Ruth Stout's books through a used bookseller. You also can order the VHS or DVD video Ruth Stout's Garden from Gardenworks 
 

Mulch Matters The Benefits of Gardening with Mulch

One of the easiest ways to ensure success in your garden, especially a vegetable garden, is to incorporate mulching into your garden preparations. This doesn’t have to break the bank, but it will provide you dividends in the abundance of vegetables you will harvest from your garden. Whether you live in the city, country, or suburbia, and whether you have a huge garden, raised beds, or even if you are using pots and containers, mulches are the unsung hero in the garden.

So Why Mulch?

The most basic benefit of mulch is moisture retention. Yields are directly affected by the amount of water in the soil. And, in dryer climates where rainfall is scarce, gardeners will want their soil to retain as much water as possible. Simply by covering the top of the soil in a thin layer of organic material, you will drastically reduce the level of moisture evaporated from the soil. The graphic below shows just how dramatically mulching can reduce evaporation. Mulching can retain up to 80 percent of added moisture in your soil. When you keep the top of the soil protected from direct heat, it will lose less water, and thus be a better environment for your plants. Great mulch also has the ability to breathe, and not become a place where mold issues arise, which would be unhealthy for plant life.
Compost is technically not mulch, but rather a soil amendment, an additive used to increase soil nutrition. Compost can also be used as a top dressing. It is a very significant component of a great garden, so it is good to keep it in mind as part of your gardening efforts.

Different Types of Mulches

There are many different types of mulch, and some of these cost little to nothing. Some common mulches are pine straw, grass clippings, leaves, newspapers, and wood chips.

Pine straw makes for fabulous mulch, but you have to make sure you place pine straw near acid-loving plants. In some parts of the country pine straw is an abundant free resource, and is very convenient to collect. Many acid-loving fruits and vegetables benefit from pine straw mulch, including blueberries, strawberries, garlic, tomatoes, and potatoes. A drawback to pine straw mulch is that it can be messy, the color fades very quickly, and it’s very flammable.

Grass clippings also make fabulous mulch; the best part being that they are free and accessible. Furthermore, you are re-distributing garden and lawn matter to other areas of your garden, which carries the added benefit of providing a place to dispose of that matter. The grass clippings will add nitrogen and much needed nutrients for beneficial microbes that inhabit the soil, which your plants will love.
A word of caution about removing grass clippings from the side of the road: you must be sure that the grass is not chemically laden with fertilizers and pesticides. The only other issue that could crop up is that if the clippings come from a weedy area you may be transferring weeds or undesirable plants unknowingly.

Leaves are a favorite mulch of many gardeners. There are few to no drawbacks when mulching with leaves, and they can be spread to protect your soil during winter months. Oak and maple leaves in particular are popular mulch material because they are plentiful. Mowing over the leaves turns them into shredded mulch, which helps release some moisture, and also makes them easier to spread. Many times, leaves are free for the taking since most folks won’t mind you raking their lawns for them, and that will happily load you up with your fill of mulch!

Next up is newspaper. Your first thought might be “ugh!” but there is a place in the garden for non-colored and non-magazine-type newsprint. It’s inexpensive, available, and can often be found at your local recycling bin. Newspaper is a very easy and efficient way to keep weeds at bay as well as assisting to keep the soil moist. It is particularly helpful when you have not been able to amend your soil as well as you would like too, or if your garden plot is in an extremely dry location with lots of drainage. You will want to wet your newspaper down when you use it and you will need to place another type of mulch on top, possibly mixed with some amended soil and compost, to help hold the newspaper down.

Composting is basically decomposing your kitchen trash from fresh foods such as vegetable scraps, egg shells, whole grains, any green growing material, chicken, horse, cow, or rabbit manure (but not household pet waste), and any dried matter in the garden. Often, local horse farms will gladly let you come collect their manure right out of the barns or pastures and in many cases you can barter with friends, neighbors, or your local farmer for chicken or rabbit manure. Rabbit manure can be put straight into the garden and is often referred to as “Gardeners Gold.”

Another mulch option is wood chips, shredded wood, or saw dust; however it is important to note that you should not use treated wood as it is loaded with chemicals and not good for you or your garden. There is debate over whether you should place fresh wood chips in your garden, and popular opinion is on both sides of the fence. Some folks say the fresh wood chips rob the soil of much-needed nitrogen and other folks argue that the fresh wood chips may decrease nitrogen initially but then it cycles back to the soil by naturally breaking down and amending the soil. Whatever you decide in the end, wood is nice and heavy and it will keep the soil moist and cool along with keeping weeds away from your beautiful plants.

Reducing the Cost

You may find mulching to be expensive, and it could be, if your garden is large and you don’t have any of the six mulches above at your disposal. But many communities have options for free mulch: some communities have yard debris recycling programs that turn debris into mulch, allowing citizens to gather it for free or a very small cost. Sometimes tree companies give away shredded branches as mulch. Landfills may have some free mulch options as well. Check online forums and hardware store bulletin boards for options in your local area. Mulching is probably not out of your reach.

Storing Mulch

When gathering mulch in the fall or winter when it is more readily available, you need to address storing the mulch for spring and summer use. The most important issue when storing mulch is to keep it dry. If the mulch is completely dry then you could store it in plastic bins, trash bags, or trash cans. If the mulch is not dry then your next best option would be to pile it up in the yard in an out-of-the-way location and turn it frequently until it dries out, then store in bins or bags.

Placing Mulch in the Garden

Placing mulch in the garden should be done very strategically. For example, wait until most of your seedlings sprout through the top soil: this allows time for any volunteers to poke through the ground, for transplanting elsewhere in the garden. It is also a good idea to add more mulch halfway through the gardening season and to spot-check your gardening areas from time to time so you can ensure the soil for your plants is staying moist.
Mulch is an often-free, valuable resource for the success of a garden. It keeps your roots moist, adds beneficial nutrients to the soil, and can really make the difference to an abundant garden. Take the time to experiment with different mulches, keeping note of which mulches work best with your plants. Also, to have your garden soil tested, contact your local agricultural extension office or check out our soil testing article, to make sure you are using the ideal mulch for your garden.
To sum up, it pays to consider the best mulch option for your garden situation and conditions. Consider your soil requirements, your space requirements and your wallet. Your payoff is in abundant plant production. I wish you much success as you add beneficial nutrients and just the right amount of ongoing moisture by using mulch.
Have you mulched much lately?
Embed the article on your site
http://www.fix.com/blog/gardening-with-mulch/

Wednesday, March 26, 2014

Asparagus Growing Guide

Rich in B vitamins, vitamin C, calcium, and iron, asparagus is one of the first crops of spring harvest.

growing asparagusAsparagus is a perennial vegetable grown for its delicious young shoots. Rich in B vitamins, vitamin C, calcium, and iron, asparagus is one of the first crops of spring harvest. Fresh-picked spears are far more tender and tasty than store-bought ones.
Asparagus thrives in any area having winter ground freezes or dry seasons. The mild, wet regions of Florida and the Gulf Coast are about the only places where it’s difficult to grow.
Planting
Select and prepare your asparagus bed with care; this crop will occupy the same spot for 20 years or more. It can tolerate some shade, but full sun produces more vigorous plants and helps minimize disease. Asparagus does best in lighter soils that warm up quickly in spring and drain well; standing water will quickly rot the roots. Prepare a planting bed about 4 feet wide by removing all perennial weeds and roots and digging in plenty of aged manure or compost.
Asparagus plants are monoecious—each individual plant is either male or female. Some varieties of asparagus, such as ‘Jersey Knight’ and ‘Jersey Giant’ produce all male or primarily male plants, so they’re more productive—male plants yield more harvestable shoots because they don’t have to invest energy in producing seeds. Choose an all-male variety if high yield is your primary goal. If you like to experiment, you may also want to grow an heirloom variety or a purple-stalked variety like ‘Purple Passion’. With an all-male variety, twenty-five plants are usually adequate for a household of four; plant double that amount for standard varieties. (Ardent asparagus lovers recommend tripling these quantities.)
Starting asparagus from 1-year-old crowns gives you a year’s head start over seed-grown plants. Two-year-old crowns are usually not a bargain. They tend to suffer more from transplant shock and won’t produce any faster than 1-year-old crowns. Buy crowns from a reputable nursery that sells fresh, firm, disease-free roots. Plant them immediately if possible; otherwise, wrap them in slightly damp sphagnum moss until you are ready to plant.
To plant asparagus crowns, dig trenches 12 inches wide and 6 inches deep (8 inches in sandy soil) down the center of the prepared bed. Soak the crowns in compost tea for 20 minutes before planting. Place the crowns in the trenches 1½ to 2 feet apart; top them with 2 to 3 inches of soil. Two weeks later, add another inch or two of soil. Continue adding soil periodically until the soil is slightly mounded above surface level to allow for settling.

Asparagus Growing Guidelines
Apply mulch to smother weeds, which compete with the young spears and reduce yields. Carefully remove any weeds that do appear. Water regularly during the first 2 years after planting. As asparagus matures, it crowds out most weeds and sends long, fleshy roots deep into the earth, so watering is less critical. Fertilize in spring and fall by top-dressing with liquid fertilizer (such as compost tea) or side-dressing with a balanced organic fertilizer.
Leave winter-killed foliage, along with straw or other light mulch, on the bed to provide winter protection. Remove and destroy the fernlike foliage before new growth appears in spring; it can harbor diseases and pest eggs.
If you want to grow white asparagus, which has a slightly milder flavor than green asparagus, blanch the spears by heaping up soil or mulch over the bed before they emerge.
Starting Asparagus from Seed
It takes patience to start your asparagus patch from seed, but there are advantages to gain from the extra wait. Seed-grown plants don't suffer from transplant trauma like nursery-grown roots, and you can buy a whole packet of seed for the same price you'll pay for one asparagus crown. Most seed-grown asparagus plants eventually out-produce those started from roots. Growing from seed also allows you to selectively discard female plants and plant an all-male bed, no matter what variety you choose to grow.
In the North, start seedlings indoors in late February or early March. Sow single seeds in newspaper pots, place the pots in a sunny window, and use bottom heat to maintain the temperature of the mix in the pots at 77°F. When the seeds sprout, lower the temperature to 60° to 70°F. Once the danger of frost is past, plant the seedlings (which should be about 1 foot tall) 2 to 3 inches deep in a nursery bed.
When tiny flowers appear, observe them with a magnifying glass. Female flowers have well-developed, three-lobed pistils; male blossoms are larger and longer than female flowers. Weed out all female plants. The following spring, transplant the males to the permanent bed.
Problems
Healthy asparagus foliage is necessary for good root and spear production. Asparagus beetles, which chew on spears in spring and attack summer foliage, are the most prevalent problem. The 1/4-inch-long, metallic blue-black pests have three white or yellow spots on their backs. They lay dark eggs along the leaves, which hatch into light gray or brown larvae with black heads and feet. Control by hand picking; spray or dust seriously infested plants with insecticidal soap. These methods also control the 12-spotted asparagus beetle, which is reddish brown with six black spots on each wing cover. Asparagus miner is another foliage-feeding pest; it makes zig-zag tunnels on the stalks. Destroy any infested ferns.
Avoid asparagus rust, which produces reddish brown spots on the stems and leaves, by planting resistant cultivars. Minimize damage from Fusarium wilt, which causes spears, leaves, and stems to be small with large lesions at or below the soil line, by purchasing disease-free roots and using good garden sanitation. Crown rot causes spears to turn brown near the soil line. Prevent crown rot by planting in raised beds, maintaining good drainage, and keeping soil pH above 6.0.
If your asparagus bed does become infected by disease organisms, your best option is to start a new bed in a distant part of the garden, using newly purchased or grown plants.
If young spears turn brown and become soft or withered, they may have been injured by frost. Cover spears with mulch or newspaper when freezing nights are predicted.
Harvesting
Don’t harvest any spears during the first 2 years that plants are in the permanent bed. They need to put all their energy into establishing deep roots. During the third season, pick the spears over a 4-week period, and by the fourth year, extend your harvest to 8 weeks. In early spring, harvest spears every third day or so; as the weather warms, you might have to pick twice a day to keep up with production. Cut asparagus spears with a sharp knife or snap off the spears at, or right below, ground level with your fingers.
This article is courtesy of Rodale's Ultimate Encyclopedia of Organic Gardening.

Tomato Math – How Many Plants is Enough?


Just how many tomato plants will you need to feed your family?
One of the primary reasons I garden is to fill my pantry with canned fruits and vegetables that are free of bpa and pesticides. Of all the different things I preserve, tomatoes are far and away the most-used ingredients in my household; it seems I’m constantly pulling a jar of some sort of tomato product or another out of the pantry. In previous years, it’s been pints and quarts that I put up from our big California garden. I ran out of the canned goods I brought with me when we moved some time ago  and I’m reduced to buying canned tomatoes – it’s killing me. (And yes, the movers DID think I was nuts. But I needed the jars; why not bring them full?)
As the time for planting a garden nears, I’m gearing up to once again fill my pantry with tomatoes from the garden. In the past, I’ve planted as many as 40 tomato plants in a season and always had plenty for me as well as lots to share, but my space wasn’t nearly as limited. Here on this small lot where (ironically) full sun is scarce, there’s not room to wantonly plant excess. I need to know – roughly – about how many tomato plants will yield enough fruit to fill my larder.
I know that yields will depend upon the variety of tomato as well as the weather and my general success, but this page about preserving tomatoes says:
One bushel of fresh tomatoes weighs 53 pounds and yields approximately 18 quarts of canned tomatoes or 15 to 18 quarts of juice. Approximately 2 1/2 to 3 1/2 pounds of fresh tomatoes makes 1 quart of canned tomatoes.
Past experience in a hot summer region leads me to believe that a single tomato plant can yield as much as 20-30 pounds per season. Since I’m gardening in a region that’s new to me and notorious for being hard to grow tomatoes in, let’s assume I can get 10-15 pounds of tomatoes from each plant. This is nothing but a wild guess, but we’ve got to start somewhere, right?
In a year’s time, my family of four (including two teenage boys) will eat:
  • 26 quarts of pizza sauce (in 52 pint sized jars)
  • 24 quarts of marinara sauce
  • 36 quarts of salsa (I use salsa in chili recipes and Mexican dishes in addition to serving it with chips)
That’s 86 quarts of tomatoes (more or less, as there will be other ingredients tossed in with the tomatoes).
In order to stock my pantry with the tomato products we eat regularly, I’ll need to grow 258 pounds of tomatoes. That means I’ll need between 17-25 tomato plants in order to accommodate my family’s needs.
I don’t have room for that many tomato plants, but I’m told that with the mild weather here in Hawaii, I can get two or three crops a year. Which begs the question: if I can grow so many tomato crops in a season, do I really need to preserve so much? Maybe I can get by with fresh tomatoes for some of my cooking needs. We’ll see how this plays out!


http://www.attainable-sustainable.net/tomato-math-how-many-plants-is-enough/

Wednesday, February 12, 2014

The world’s biggest vertical farm is set to soon open in Scranton, Pennsylvania

While the vertical farm, which is scheduled to open in an industrial suburb of Scranton’s Lackawanna County in March, is only a single storey in height, its 3.25 hectares will come equipped with an industrial racking system comprised of four to five levels and will be capable of housing a staggering 17 million plants in total.
The construction of the vertical farm by Michigan’s Green Spirit Farms (GSF) will entail an investment of at least $27 million for the purchase of a large-scale industrial facility and is expected to bring around 100 jobs to the region.
The vertical farm, which by definition involves the cultivation of plants on vertically inclined surfaces instead of on the ground, will employ correct full spectrum induction lights to nurture a broad variety of foodstuffs on its multi-tier industrial racks, including tomatoes, lettuce, spinach, basil, strawberries and peppers.
As advocates of vertical farming as a sustainable practice, GSF’s operation places a heavy emphasis upon efficiency and recycling. The development of the company’s first vertical farm was prompted by a protracted drought which has beset many arable parts of America,  and its facilities involve the extensive water recycling.
According to GSF research and development manager Daniel Kluko, the Scranton facility will use 98 per cent less water per unit of production than conventional ground-based cultivation methods because of the extensive recycling measures that vertical farming permits. These measures include the use of a dehumidifier to scour water from the air of rooms housing the plants, which also provides the bonus of reducing the incidence of humidity related problems such as leaf mould.
The farm will also take advantage of the latest networking technology, with comprehensive data on its performance accessible via smartphone
Vertical farming has seen a surge in its popularity around the world, with advocates touting it as the future of agriculture on an increasingly urbanized planet due to the economies it achieves in terms of space and resource usage.
Agriculture could also become far more secure as a result of indoor vertical farming, which permits production during extreme weather conditions and obviates the need for herbicides or insecticides as long when properly monitored and tended.
http://www.zeitnews.org/applied-sciences/agriculture/world-s-biggest-vertical-farm-set-soon-open-scranton-pennsylvania