Showing posts with label homemade. Show all posts

Wednesday, August 19, 2015

Homemade Tomato Ketchup from scratch

Recipe courtesy of Jamie Oliver
http://www.foodnetwork.com/recipes/jamie-oliver/homemade-tomato-ketchup-recipe.html
Total Time: 1 hr 45 min
Prep: 1 hr
Cook: 45 min

Yield: about 1 pint

Level: Advanced

Ingredients

1 large red onion, peeled and roughly chopped
1/2 bulb fennel, trimmed and roughly chopped
1 stick celery, trimmed and roughly chopped
Olive oil
Thumb-sized piece fresh ginger, peeled and roughly chopped
2 cloves garlic, peeled and sliced
1/2 a fresh red chili, deseeded and finely chopped
Bunch fresh basil, leaves picked, stalks chopped
1 tablespoon coriander seeds
2 cloves
Sea salt
1 teaspoon freshly ground black pepper
1 pound amazing cherry or plum tomatoes, halved plus 1 pound canned plum tomatoes, chopped or 2 pounds yellow, orange or green tomatoes, chopped
3/4 cup plus 2 tablespoons red wine vinegar
1/3 cup soft brown sugar

Directions

Place all the vegetables in a large heavy-bottomed saucepan with a big splash of olive oil and the ginger, garlic, chili, basil stalks, coriander seeds and cloves. Season with the pepper and a good pinch of salt.

Cook gently over a low heat for 10 to 15 minutes until softened, stirring every so often. Add all the tomatoes and 1 1/2 cups of cold water. Bring to the boil and simmer gently until the sauce reduces by half (this may take a while).

Add the basil leaves, then whiz the sauce in a food processor or with a hand blender and push it through a sieve twice, to make it smooth and shiny. Put the sauce into a clean pan and add the vinegar and the sugar. Place the sauce on the heat and simmer until it reduces and thickens to the consistency of tomato ketchup. At this point, correct the seasoning to taste.

Spoon the ketchup through a sterilized funnel into sterilized bottles, then seal tightly and place in a cool dark place or the refrigerator until needed - it should keep for 6 months. (can also water bath to help with preservation)

Homemade Tomato Ketchup (from organic Tomato Paste)

http://www.collective-evolution.com/2014/08/18/diy-homeade-ketchup-kick-heinz-other-unhealthy-brands/

Ketchup is a pretty common staple in many American households. Kids seem to love it, and even as we grow up, the joy of ketchup seems to remain. In fact, McDonald’s uses about 250 million lbs. of ketchup in their restaurants annually. The problem is, is the ketchup we eat at fast food restaurants, or popular brands like Heinz that we use at home healthy?
Personally I hate the taste of Heinz. To me it’s very fake, sugary and chemically. Even the organic brand of Heinz is quite nasty for my palate. I currently use another organic brand that contains only clean and pure ingredients and I like it a lot better because it tastes like something you’d make fresh. But this! This is on my list to begin making.

Are All Ketchup’s Made Equally?

Various brands of ketchup will use different ingredients that will either make the end product healthier or not. Some of the big ones to look out for are:
– Are the tomatoes organic?
– Is there High Fructose Corn Syrup or Glucose/Fructose in it?
– Does it contain corn starch?
– Does it contain MSG?
The reason why you want to look out for these things is because it can either mean there are a lot of unwanted pesticides or toxins in the ketchup. If it contains HFCS or Glucose/fructose or corn syrup, you can bet it contains genetically modified ingredients (GMOs.) Not to mention, those ingredients can be very unhealthy for the body. MSG and other flavorings also don’t fair well with your health and are a good thing to avoid.
One of the most popular brands of ketchup, Heinz, has the follow ingredients: tomato concentrate made from red ripe tomatoes, distilled vinegar, high fructose corn syrup (HFCS), corn syrup, salt, spice, onion powder, and natural flavors.
I’ve highlighted in bold the ingredients that would be best avoided. The tomatoes would contain pesticides. The HFCS is a neurotoxin and a very unhealthy type of sugar. Both HFCS and corn syrup are likely GMO. The salt is likely table salt which dehydrates the body and extracts minerals. Sea salt is always best.

DIY Homemade Organic Ketchup

fries
So here is how you can make your own healthy ketchup and the best part is you will know exactly what’s in it and you can source your own ingredients how you like. We always recommend organic or home-grown ingredients but of course that may not always be possible. This doesn’t mean you should stick with the old stuff, make it yourself but use as best ingredients as you can.
  • 1 6 oz can organic tomato paste (make sure the can is BPA Free)
  • ¼-1/2 cup apple cider vinegar (see Note)
  • ½ teaspoon sea salt or Himalayan salt
  • ½ teaspoon dried oregano
  • ½ teaspoon cumin
  • ⅛ teaspoon pepper
  • 1 teaspoon mustard powder
Note: If you want less vinegar than the full ½ cup of apple cider vinegar, just add water to a total of ½ cup of liquid.

Method

1. Combine all ingredients in a small bowl and mix well.
2. That’s it!
This recipe will keep well in the fridge for a couple of weeks. Just store it in a sealed contain and you’re good to go.

Monday, May 11, 2015

Making Transparent Soap
This is the result of my experiments making transparent soap. I am in no way, shape or form an expert, but I have successfully made transparent soap using recipes found on the web as well as formulating my own. I highly recommend reading the book "Making Transparent Soap" by Catherine Failor before you begin. This tutorial is not intended to replace the book, it is intended to complement the book. Transparent soap is basically partly soap and partly solvent. Sodium Hydroxide causes crystals to form in soap and that is why the soap becomes opaque, in order to make it transparent, you have to dissolve the soap in enough solvent to make the crystals so small that the the light will freely pass through the soap, which makes it look transparent. There is no magic number when it comes to the quantity of solvents required for a particular recipe, transparency will exist in a narrow window within a range. A good way to find the right quantity of solvents is to start by calculating a 60% soap/40% solvent ratio and then a 50% soap/50% solvent ratio, depending on your formula, transparency will exist somewhere in that range. (See the calculation page for tips on formulating your own recipes and to download a Transparent soap calculator to help you with the task.
This tutorial is intended for people who already know how to make soap and are aware of the safety precautions that should be taken in order to do so.
In this tutorial, we will use a very popular recipe by Jeff Bobeck. It is a good basic recipe and it works, it yielded my first successful batch of transparent soap, I modified it because I use 75.5% Alcohol instead of the 70% Alcohol used in the original recipe. Formulas can be adapted to use with the Alcohol you can find, although it would be difficult to go below 70% (140 Proof). Ideally, if you can find 190 Proof Alcohol, use it, it will make your life easier, if you can't, you can adapt a recipe to work with what you can find, just go to the calculation page to find out how. You need Ethanol (grain Alcohol) (Everclear) to make transparent soap, Isopropyl Alcohol will not work. I use a crock pot, I have gas appliances so I can't do it on the stove, using a slow cooker is an easy way to do it without the risk of setting the house on fire.
First, print the recipe, assemble your supplies and clear 5 to 6 hours off your schedule. Preheat your oven to 180F (if it will go that low, if not, you will use the slow cooker to bring your soap to gel). Put a clear cup or glass in the freezer, you will need it to test the transparency of your soap. You will also need a wisk, lots of spoons, a spray bottle with alcohol in it, colorants (food colorants work, Select Shades are great), FO or your favorite perfume, a large pot with a spout, some Glad Press'n seal plastic wrap and a small plastic strainer.
Measure your oils and heat them up in the slow cooker, I use a 4 quarts slow cooker, anything smaller would not work for this recipe, if you use a larger crock pot, you may have to tip it on its side somewhat so you can use your stick blender to mix the oils and the lye solution. Mix the lye with 6 oz of water and set aside to cool. When the oils and the lye are about 140F, pour the lye solution into the oils and stir with the stick blender, it should take only a few minutes to get to a good medium trace.
At that point, put the cover on the soap and put it in a 180F oven for 1 1/2 hour. (If your oven won't go that low, just leave the soap in the slow cooker on warm and check it after an hour to see if it is going through the gel stage, I am not sure how long it will take for the soap to become neutral that way, but it should not take more than 2 hours. Try to minimize water loss because we already took a big water discount).
After 1 1/2 hour, your soap should be neutral (PH of 9 - 10.5 is fine). The entire soap mass should be in the gel stage and look like somewhat like this:
Stir it and test it either with phenolphthalein (if you have any) or litmus paper, if you don't mind the "tongue test", there should be no zap :) (To test using Litmus paper, dissolve some of the soap into a little bit of water and apply the paper to the soap, this should give you a good reading).
When you are certain that your soap is "neutral", it is time to mix in the Alcohol and the Glycerin. Measure 13.5 oz of Alcohol and 3 oz of Glycerin. Mix the Glycerin into the Alcohol and then, off heat, start pouring into the soap mass while stirring with a whisk. Pour the Alcohol/Glycerin mix in slowly, taking time to break up lumps of soap. You must work quickly in order to minimize the loss of Alcohol, but do not panic and go too fast, take the time to break the big lumps. Finish with the stick blender or a potato masher, anything that will break the bigger pieces. Make sure you get all the soap that sticks to the sides and the bottom of the bowl. All the soap will not dissolve completely right way, you will have pieces of soap floating in a soupy mixture of Alcohol/Glycerin and dissolved soap. That's alright, the little lumps will dissolve during the cook. Keep your head away from the bowl otherwise you will get an instantaneous hang over ;). start the kitchen fan, Alcohol vapors are highly flammable and you don't want them to accumulate in your kitchen.
Put the cover back on the crock pot insert and put the insert back in the slow cooker. Cook on warm (depending on your slow cooker, you may have to start it on high for a few min., then put it back on warm) for 30 - 45 min. Check it once in a while, the temperature should be between 160 - 180F. I have a very cheap slow cooker that I bought at Wallmart for $15.00 and the lid does not fit very well, so I put a band of Glad Press'n Seal plastic wrap around the edge of the lid to prevent the loss of Alcohol while the soap cooks.
After 30 - 40 minutes of cooking time, check to see if the soap is well dissolved, there will be a layer of foamy soap on top, spray that down with some alcohol in a spray bottle. Stir with a clean spoon. Some of it won't want to go back into the solution and will float on top, do not worry, this is normal, we will address that a bit later. Prepare your sugar syrup. Heat 4 oz of water to a boil, turn off the heat, pour in 8 oz of sugar and stir until all the sugar is dissolve. Turn the heat back on and bring it back to a boil, then let simmer covered for 1 - 2 min to make sure all the sugar is well dissolved.
Pour the sugar solution into the soap and stir. Take a large soup ladle and skim the foamy soap from the top, put that in a small dish, mash it and scent it, add a little bit of glycerin to it and pour it in a mold. This time I had 2.9 oz of foamy soap, it made a nice little hand soap.
Get the cup you put in the freezer before you began the soap, and pour a little bit of the clear soap stock on it to test the transparency.
At first the soap sample may look transparent, but it may not be, put the cup in the freezer for 5 - 10 min and look at it again. If your soap looks milky, it needs more solvents. That is when making transparent soap can test your patience. Do not panic at this time and think the soap will go bad if you have to make more than one test, the soap is perfectly fine on warm setting in the crock pot, as long as you keep the mixture around 160F, you can take all night to adjust it if you want, just make sure to spritz some Alcohol on it and then put the cover on to minimize the loss of Alcohol in between tests. You may have lost some of the Alcohol during cooking time so your soap is not transparent yet. (That is what happened to me this time). We are working from an existing recipe that we know works, so the solvent requirements should be pretty close to the numbers provided. In my case, I added .5 oz of Alcohol. My soap was still not transparent enough, so I added 2 oz of sugar dissolved in 1 oz of water. Finally, I added 2 oz of glycerin, 1 oz at a time. (For a total of 14 oz of Alcohol, 10 oz of sugar in 5 oz of water and 5 oz of glycerin). I didn't have to do that the last time I made that soap, that shows that you may have to adjust recipes, even good ones, because there are a lot of factors that can influence the final results.
I finally had a clear sample, so it was time to pour the soap into a jar to let it cool down a little. I poured through a strainer, to keep any soap flecks or foam out of the final soap stock.
Cover the jar with some Press'n Seal and insert a thermometer, let the soap cool to about 140F before you add the colors and the fragrance.
When your soap has cooled off to 140F, scent and color it, then pour it into molds. (There will be a skin on top of the soap, spritz it with a little alcohol and then mix it, it should dissolve). You may have some foam on top of the soap after you pour it in the molds, a good spritz of Alcohol should take care of it. (Note: I pour my soap in my molds through a small strainer, just to make sure)
If you can, put the molds in the freezer, the faster the cool off, the more transparent the soap, if you do not have enough space in the freezer, put the molds in the fridge.
After a few hours, check the soap, if it is hard enough, you can unmold it, take it out of the freezer and wait about 5 min. before you pop the soap out of the mold. Be careful not to touch it too much, because at this point, you will leave fingerprints on it. Let the soap dry and cure for about 2 weeks before you use it, during those two weeks, it will become harder and even more transparent. A skin will form on top of the soap, polish it with alcohol and then wrap in shrink wrap to keep the humidity out.
Note: Home made transparent soap is different from M&P, if you try to melt it again, it will loose its transparency, you will have to adjust the solvents and you may end up with a soft sticky soap. If you absolutely have to remelt the soap, do it as soon as possible after making it, but be prepared to add alcohol, glycerin and sugar solution again.
See my experimental transparent soap
Go to the Calculation page
http://www.bearchele.com/soap/Tutorial.html

Wednesday, February 4, 2015

Handmade, Homemade Soap Recipes: The Art of Natural Soap Making (my newest hobby)

Homemade Soap Recipes
Looking for homemade soap recipes? Well then....you've come to the right place!
There are so many wonderful ingredients involved in soap making and I seem to have a desire to try them all! Since I'm pretty sure you would too, I'm posting each successful soap recipe I create so that you can try them for yourself.
This page will serve as a hub for recipes suitable for cold process, room temperate and hot process soap making methods (many designs may not be possible for use with the hot process method but the base recipes should all work just fine).
Below you will find a varied selection of soaps, each with a link to the recipe and corresponding instructions. Feel free to play around with them, change them up if you like or just make the as they are.
If you prefer to completely create your own look, try the Basic Soap Recipes page for another long list of recipes to try.
Each homemade soap recipe on my site produces approximately 10 - 110 to 150 gram bars.
Remember to always check soap recipes with a lye calculator before using them just to be sure that they have the correct amount of lye listed.

Soap Recipes List

Made using the room temperature method. Ingredients include coconut oil, palm oil, olive oil, castor oil and beautiful soap colours.

Made using the room temperature method. Ingredients include coconut oil, palm oil, olive oil, castor oil, shea butter, fresh and powdered goat milk.

Made using the room temperature method. Ingredients include coconut oil, palm oil, olive oil and castor oil.

Plain and simple. Made with Coconut, Olive and Palm Oils.

Made with Coconut, Olive, Palm and Camellia Oils.

Made with Shea Butter, Coconut, Palm and Olive Oils.

Made with Coconut Oil, Comfrey infused Olive Oil and Palm Oil.

Made with Shea Butter, Coconut, Palm, Castor, and Olive Oils.

Made with Calendula and Chamomile infused Olive Oil, Coconut Oil and Palm Oil.

Made with Coconut, Olive and Palm Oils.

Made with Hemp, Coconut, Palm and Olive Oils.

Made with Hemp Seed, Coconut, Palm, Castor and Olive Oils.

Made with Coconut, Palm, Castor and Olive Oils.

Made with Carrot infused Olive Oil, Coconut, Palm and Castor Oils.

Made with Apricot Kernel, Coconut, Palm, Castor and Olive Oils.

Made with Camellia, Coconut, Palm and Olive Oils.

Made with Cocoa Butter, Shea Butter, Castor, Coconut, Carrot infused Olive, Palm Oils and Apricot Kernel Oil.

Made with Shea Butter, Coconut, Palm, Castor and Olive Oils.

Made with Shea Butter, Coconut, Palm, Castor and Olive Oils.

Made with Shea Butter, Coconut, Olive and Palm Oils.

Made with Apricot Kernel, Coconut, Olive and Palm Oils.

Made with Sweet Almond, Coconut, Olive and Palm Oils.

Calculation for Soap Mold Volume

Not sure how much soap will fit in your mold? Here is a formula that will calculate how much oil you need in your homemade soap recipe to make the right size soaps.
Length of mold x Width of mold x Height of soap x .40 = ounces of oil needed

example: My mold is 6" x 6" and I pour my soap to 2.25" high so the calculation will be:

6" x 6" x 2.25" x .40 = 32.4 ounces

Since I like working in grams, I convert the ounces over by mulfiplying the ounces by 28.375

32.4 ounces x 28.375 = 919.35 grams (I use 900 grams of oil in my recipes for simplicity)
Return to top of Homemade Soap Recipes page

Monday, January 12, 2015

homemade yogurt & spelt crackers

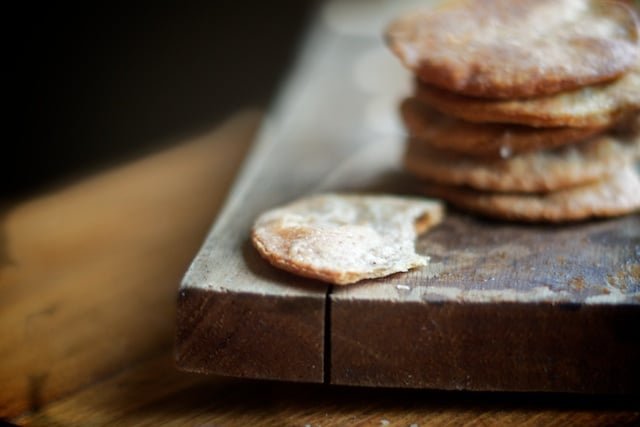
Homemade crackers are well-loved in our home – rustic, flavorful and tender, they’ve become a favorite of both visiting children and adults.  While preparing homemade crackers doesn’t require too much time or kitchen know-how (even a novice can master the slow techniques of mixing, kneading and rolling), the results are simply lovely – a reminder of a time gone-by when everything served at the supper table was made with love, and always from scratch.
In our version of homemade crackers, we rely on whole grain flour for its rich and earthy flavor and nutritive value.  First whole grain flour is combined with fresh yogurt, and allowed to rest overnight which fulfills the dual purpose of not only improve the tenderness of the grain, but also improving its nutrient profile.  All whole grains contain antinutrients – naturally present substances like food phytates which keep the grain from sprouting until conditions for the plants growth are optimal, but also bind up with minerals in our digestive tracts, preventing their full absorption.  Fortunately, the traditional methods of soaking, sprouting or souring grains prior to preparing breads, cakes, muffins and even homemade crackers not only improves the bioavailability of minerals, but also improves their digestibility and flavor.
In this recipe for homemade crackers, we use whole, full-fat yogurt to soak the flour before combining the dough with good quality grass-fed butter, which creates a flaky texture and crumb.  Season the crackers with coarse sea salt, dried chives or dill, or leave them plain, anyway you make them is worth your time and effort.

homemade yogurt & spelt crackers
Prep Time: 20 minutes
Cook Time: 7 minutes
Total Time: 27 minutes
Yield: 120 crackers (12 Servings)
Flaky, tender, crispy – these homemade crackers take little effort; however, they’re prepared first by soaking whole grain spelt flour in fresh yogurt which both tenderizes the flour and improves its nutritive qualities. Consider adding dried herbs to the dough for a variation in flavor.
Ingredients
  • 3 cups whole grain spelt flour 
  • 1 teaspoon unrefined sea salt 
  • 1 cup full-fat yogurt (try making raw milk yogurt)
  • 1/2 cup butter (plus 2 tablespoons melted butter)
Instructions
  1. Stir three cups whole grain spelt flour and one teaspoon unrefined sea salt with one cup full fat yogurt in the bowl of a stand mixer equipped with a dough hook. Continue to process until the dough forms a smooth ball.
  2. Place the dough in a mixing bowl and cover it with a tea cloth. Leave the dough to rest at room temperature overnight and up to twenty-four hours.
  3. Once the dough has rested overnight or up to a full day, preheat the oven to 450 degrees Fahrenheit.
  4. Knead one-half cup softened butter into the dough, then divide the it into four separate balls to make rolling it more manageable.
  5. Flour your working surface and your rolling pin, place one ball of dough into the center of your work surface and roll it to 1/8-inch. Cut the dough into rounds with a biscuit cutter, or into triangles or squares with a pizza cutter or sharp knife.
  6. Brush each unbaked cracker with melted butter, prick with the tines of a fork to prevent puffing and bake in an oven preheated to 450 degrees Fahrenheit until brown and crispy, about six or seven minutes.

Saturday, January 4, 2014

How to Make Rag Rugs

by MERISSA on NOVEMBER 29, 2013
How to Make Rag Rugs - Little House Living

How to Make Rag Rugs

 As I've mentioned before, we've been very excited to get moved into our farmhouse since we basically found out we didn't have any other options. But even though that was the case, we are determined to make the best of it that we can.
Previously to moving into our camper, we sold everything. And I do mean EVERYTHING. Everything that we did not use on a daily basis, all furniture, all decor, and anything extra that couldn't fit in the rv (some clothes, books, ect) was sold. I didn't think anything of it because at the time we planned on living in the camper for a few years while we traveled and then moved it onto some land.
Well I guess not everything turns out the way we planned so here we are, 9 months later in our new home without anything much for it and without any money to buy things for it. You might think that this was a depressing scenario for us to face but as I mentioned above, we are bound and determined to make the best of this, no matter what. I've been raised as a hardy South Dakota girl. We make the most with what we have or we simply do without.
One of the things I wanted for my new house was some pretty rugs. I had one large area rug that we had in the camper that I put in the living room but that was it. So one day I wandered into the thrift store and headed over to the bedding department. Although you can generally find fabric at the thrift store, if it's large quantities you are wanting, go for the bedding section. I picked out a king and a full sheet with patterns that I felt went together and paid a whole $1.50 for the both of them. I headed home with my new-to-me sheets and made them into this beautiful rug for our home.
It was incredibly cheap (for a nice rug) and not very hard to put together. It did take some time but it's something you can work on during these cold winter evenings. I plan to make more as I find more sheets so we have pretty rugs all throughout our new house. Here's a tutorial on how to make rag rugs so you can make some too! I suggest doing this to the Pa's Fiddle Band cd for full "homesteading" effect. :)

How to Make Rag Rugs

What You Need:
  • Rags, Old Clothing, Old Sheets, ect
  • Scissors
  • Sewing Machine
  • Thread
How to Make Rag Rugs
I found 2 old sheets at a thrift store in good shape. They were both flat sheets (which I would recommend, you can use the others but they would require more cutting, this was easy!). I felt that both sheets were complimenting colors so they would go well together
How to Make Rag Rugs
Start by cutting a small strip on the end of the sheet (lengthwise, not across). I made mine about 1 1/2 inches wide but yours can vary depending on how tightly braided you want your rug to be. Once you have this little slit made....TEAR! You can rip right down the sheet to make your strips without cutting and they will stay the same width.
How to Make Rag Rugs
Keep tearing strips from the sheets until you have as many as you want. I completely tore up both my sheets into strips because I wanted a fairly big rug for this one.
How to Make Rag Rugs
Then take a pull all the frayed strings off the edges of each piece. Make sure you keep your strips as clean as possible because these will really mess you up while you are braiding.
How to Make Rag Rugs
Take 3 strips and make a knot at the end of them. Then take the end and hook it around something to create some tension on your braid. I used a safety pin and hooked the ends around a cabinet handle.
How to Make Rag Rugs
Then braid! And braid and braid and braid.
How to Make Rag Rugs
It fun to curl up your braids every so once in a while to see how big your rug is getting and decide how many more braids you want to make.
How to Make Rag Rugs
At some point you will need to attach another strip to the end of the strip you are done braiding. This is pretty much the toughest part in the whole rug! Cut a small slit in the end of both the strip that is ending and the strip you want to add.
How to Make Rag Rugs
Pull the strip you want to add through the slit that you made in the strip that you are adding to.
How to Make Rag Rugs
Bring the other end of the new strip up and put it through the slit on the new strip to make a loop.
How to Make Rag Rugs
Pull the piece through the slit until you have a very loose knot. I found that it was better to not tighten it up otherwise it created large lumps in the rug.
How to Make a Rag Rug
Then just keep on braiding until you have a long enough braid to make the size of rug you want.
How to Make a Rag Rug
Time to sew! Set your sewing machine on a loose and large zigzag stitch. Curl the rug around its-self and sew the braids together.
How to Make Rag Rugs
I got my rug half way done and my machine broke :( I knew it was on it's last leg for a while so it wasn't too much of a surprise. You can see how pretty this rug will be once I'm done though! I'll make sure to update with a done picture when I get a new machine.